My friend and I did the electrical wiring, originally it was to consist of a series of LEDs on varying lengths of wire and that would be sufficient to light it, however, when we started doing this, we found that even our bright LEDs were not bright enough to be useful. We then experimented with different bulbs available to us, and we found that small halogen bulbs were most useful. We headed off to Bunnings to pick up some bulbs of varying wattage and a transformer. We had no problems wiring it up, and it was appropriately bright.
I took it all home to work on backing the panels with the rice paper, which went very smoothly, the spray adhesive worked particularly well, and I simply cut around the edges with a scalpel. Assembly was effortless and I was so pleased that it looked better than I'd imagined it. Fortunately there wasn't a whole lot of difference between the effect of the 20W and the 50W bulbs as the 50W bulb had a tendency to heat the lamp a fair amount, though definitely not dangerously so.Saturday, February 14, 2009
Finished!
Seeing my lamp actually take the shape of my initial design was such a satisfying feeling, considering that many friends told me I was trying to bite off more than I can chew with the design complexity. I had to learn a lot about the use of CAD to make it possible, and a lot of preparation was needed before I could even make a line or a curve on it. There were no dramas with the lasercutting except for the fact that I accidentally had 3 of one panel size and 1 of another size, so I needed one re-cut.
Now that this lamp is complete I plan to attempt to create its negative as originally planned...
Saturday, January 31, 2009
The panels are all almost complete, they only need to be made longer so that the lamp can house the light fitting without the bulb touching the MDF and therefore creating a fire risk. This will be a simple task, as I designed them in CAD to allow for any extensions needed. The base is still a little problematic, however I expect it to be finished very soon. I created a 1:1 scale model of the lamp out of paper and cardboard and it has helped me realise the angles I need to cut the base arms at to hold the panels. I have attached the photos of my model to give a good impression of the shape of the lamp, as I know the previous sketches have only told part of the story.
Monday, January 19, 2009
After a highly exhaustive process, I have finally completed my template panel for my lamp on CAD. This involved me drawing a 1:1 scale drawing of one of the panels, then measuring every point - some 200 co-ordinates.
I then drew lines to those co-ordinates in CAD from an origin so that I could firstly create an initial curve for the holes to follow, then I created boxes forming rough markers for the holes, then created arcs for the rounded corners of each of the 48 holes, then joined them up with uniquely curved lines.
At this stage, I haven't been able to determine why I'm unable to compress the shape to make it narrower for the longest panel. I have managed to scale them properly, but only the long panel is hampering my efforts, so all that remains is the 2 long panels and the base of the lamp to complete. The base, however, will require me to attain an actual light fixture so that I may acquire the appropriate measurements. All in all, I'm quite satisfied with the way these panels are looking given my lack of experience creating these complex shapes on a computer.
Wednesday, January 14, 2009
Progress...
So far it is proving difficult, but certainly not impossible, to create the shapes in CAD. What I have currently found to be useful at this stage for conveying the shapes into CAD is to first draw up the shapes to my satisfaction, then measure key points from an origin so that I may place those points in CAD and construct a series of curved lines accordingly. While it is slow-going, it is making up for my current lack of knowledge about how else to make these shapes. As I design these panels, I continue to change how I feel the base of the lamp should be constructed. Unfortunately, at this stage, I can't see the proposed second lamp being finished in time, though I won't give up hope just yet...
Thursday, January 8, 2009
LAMP1 Evolution
During my trip to the state's north this week, I had time to reflect upon the direction in which I want to take the design on my lamp/s. I have come up with an approximation of the design I want to use for the final product of lamp1. It shall consist of a repetition of one shape of fin, which I hope can be stretched using CAD to produce the varying shapes as seen below. At present, my idea for lamp2 is to make the inverse of the shape below, in that I would use the 'squares' cut out from lamp1 and suspend them to create the same shape, without the 'skeletal' structure of lamp1. Ideally it would be done with wires, but then I don't know whether that would breach the brief in that MDF may not be the primary material used. Whether or not this is attainable is a bit unclear at this stage, due to the immense complexity of making it.
It is quite unclear how well this design reflects my design intentions of DDI and Refine, so I can only go by how I feel about it, which is to say that I feel it does. Presently the only limitations placed upon this project are my CAD skills and the fact I don't confidently know how to make such a complex shape, so I shall make a serious attempt at creating it in the very near future and judge whether I can proceed with this design.
From here I shall create a single fin panel that I am most happy with, and one that can be stretched etc to create something in the order of the above design, as well as determine how the base of the lamp shall work, as well as how to incorporate the light into it.
Sunday, January 4, 2009
Interval take 2
It's been taking me quite a while to get my head around what to do next with interval, due to my lack of success with the first attempt. So far I have decided that I want to revert to my original idea of combining the mdf with lighting effects, but in a far FAR less complicated manner! As the purpose of interval was to create a piece of furniture etc reflecting the design intent of the main project, I have decided that I want to base my piece on the same weedy scorpionfish that I used to inspire my DDI design.
From here I decided that my best idea was a lamp for use within the club on tables and around the lounge areas. That way it can be stylish, functional and not too big a project to build. I started off trying to sketch a kind of 'ribbed' version of the fish, and while I like the effect of it, there will be far too many connection issues involved and thus far too complicated.
I then thought that I could do a series of layers to form a shape, in which the skeleton and skin would be separated, I so far like this idea the most, however I am not quite decided on a shape, although so far I lean most strongly to the series of 'triangles' at the bottom of the series of sketches above. It would be mirrored, so that 2 triangles would meet at the top point, and perhaps be adjustable. I am also strongly considering making an opposing pair of lamps (given that I have the funds to do so) one will be of a natural/organic flowing style, as shown in the above image, the other will be more rigid and structural in appearance. Still to be resolved however is the base on which these forms shall sit... more to come on that matter.
Friday, October 31, 2008
The making of Refine
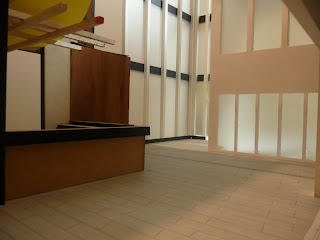
The above series of pictures show the model whilst I was building it. There are a few different views of the space including some interesting views of the outside bar and from behind the bar. Since I didn't submit these on the final poster presentation I thought the web blog was the perfect place show them.
I really liked the views from behind the bar looking out into the lane way as I think it really gives you feel for the closeness that the space can generate even though its quite large. There are some great shadows generated in the space as well in some of the images.
During the making of the model I was forced to wait 3 days to get the laser cut of the structure done because the the severe back log created by many of the 5th year students. This put me on a tighter schedule than I wanted which created a lot of stress.
Generally, I had not major issues other than that. It was just bloody too big!!! Anyway, the bar would make a great place to hang out if you were a student living their!
Subscribe to:
Posts (Atom)